Kiki’s Delivery Service -Accessories

Today’s post is a simple blueprint to finish your Kiki outfit. It’s mostly following patterns with minor changes.

dsc_0406

Bloomers

dsc_0413Kiki has a lacy pair of bloomers that peek out from under her dress as she flies her broom.

Materials:

  • Simplicity pattern 1392 View D
  • lightweight white knit fabric (3/8 yd)
  • 3/4 yd of 1/4″ elastic
  • 3/4 yd of 1/2″ wide lace

Follow the directions on the pattern. If anything, make the legs shorter.


Red Flats / Shoes

dsc_0414Materials:

  • McCalls pattern 3469 View G
  • red satin (same material as hair bow) or red leather
  • Foam remnant 6″ X 5″ (optional)

I used the same fabric for the shoes and the lining. I left off the foam, ribbon, and soutache.


Messenger Bag

Materials:dsc_0412

  • McCalls pattern 3469 View C
  • yellow or orange-yellow canvas
  • lining (I used the purple material from the dress as the lining.)
  • Snap

I left off the embroidered trim.


Now all you need is a black cat and a broom!

dsc_0406


Kiki’s Delivery Service – Hair Bow

Kiki’s huge hair bow is essential for her costume. It can be made with three rectangles of fabric.

Materials:

  • red satin
  • interfacing
  • 1/2″ elastic
  • ruler

Rectangle #1: Bow

  • Measure a rectangle approximately 12″ X 4″of both the satin and  interfacing. Interfacing should be placed on the wrong side of the satin.
  • Hamburger fold them right sides together with the interfacing on the outside. Sew the side edge, but leave a 1″ opening in the middle. (The scissors are pointing to the opening.)dsc_0422
  • Rearrange the fabric so the opening is in the center and stitch across the top and bottom edge. Clip corners and turn right side out. Hand stitch closed.

Rectangle #2: Knot

  • Cut a rectangle  3″ X 4″. Hot dog fold with right sides together, stitch tube, turn right side out.
  • With right sides together, stitch the tube into a circle.(If you’re an overachiever, you can slip stitch it closed, so that there are no raw edges. This part gets hidden, so I don’t bother with the extra work.)dsc_0428

Rectangle #3: Headband

  • Cut a third rectangle 13.5″ X 2″ on the bias so it has some extra stretch. With right sides together, stitch into a long tube that is just wider than the 1/2″ elastic. Trim excess edge. Turn right side out.
  • Cut a length of 1/2″ elastic 12″ long. Thread it through the tube.  Sew a straight line over the end of the elastic and tube. Repeat at the other end. The red material will scrunch because it is longer than the elastic.dsc_0430
  • Slide the headband tube through the knot. (The bow has also been slid through the knot in this picture, but it doesn’t have to be.)dsc_0433
  • Sew ends of tube and elastic together in a circle with right sides together. (This is another place slip stitching can make your work prettier, but I just hide this edge under the knot.)


  • Pull the headband around so that the raw end is under the knot.
  • Slide the bow through the small circle and arrange aesthetically. You may need to fold or bend the knot so that it doesn’t look perfectly flat.dsc_0445
  • You can tack everything together if you don’t want little fingers to be able to pull the bow out.

Strong work! The primary two elements of Kiki’s costume are complete. On the next post, we’ll add the finishing touches that make the outfit stand out: bloomers, shoes, and messenger bag.

Kiki’s Delivery Service – Dress

Kiki’s Delivery Service is a great coming-of-age animated film produced by the talents at Studio Ghibli. I just learned the movie is based on Eiko Kadono’s book – I need to find an English translation! If you haven’t seen the movie, I highly recommend checking your library to see if they have a copy.

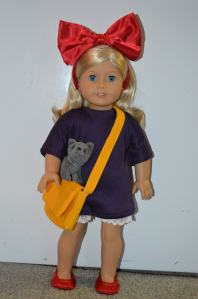
Today we’ll be modifying a dress pattern to replicate Kiki’s witch dress. We’ll later add the bow, bloomers, shoes, and messenger bag.

dsc_0406

Materials:

  • dark purple (almost black) knit fabric – anything with a bit of drape and flow will work
  • McCall’s 7266 pattern
  • matching thread
  • 1/2″ velcro

dsc_0411

Since Kiki wears a loose, flowy dress, I merged a shirt and coat pattern. I used pieces 1, 2, 3, 17, 18 from M7266. You’ll be overlapping them on folded fabric.


The back consists of piece #2 with #17 reversed and laid on top. We’ll be using the facing of #2, so that we’ll have a velcro enclosure on the back. Here is the view before and after cutting:


The front consists of piece #1 reversed on the fold and #18 laid on top. #18 hangs over the fold, so there will be a large portion of it that won’t be cut out. Here is the view before and after cutting:

If you’re wondering about the masking tape in the pictures above, they are marking the wrong side of the fabric. It is sometimes tricky to tell which is the right and wrong side of the fabric. When I have two similar sides, I use tape to tell them apart.

Sew the pieces according to the directions for the shirt (View A) included with the pattern.  Use a scant seam allowance on the sleeves to keep them wide. Using the 1/4″ seam allowance will make them look more snug than they should be. Be sure to shorten the sleeves to 3/4 length, which is still longer than View A’s directions.

dsc_0401

One of the more confusing parts of the pattern is step 5 directing you to “Stitch FRONT FACING 3 and back self facings together at shoulders.” Pattern piece 3 (front facing) is connecting the two facing pieces from pattern 2 (back) like a bridge. This is what it should look like if you stitch them together correctly:


Step 6 directs you to understitch the facing. If you’re relatively new to sewing or just need a refresher, there is a great tutorial at Sewaholic. It has images and walks you through the process of understitching. Very  helpful.

The skirt length will need to be shortened.

dsc_0410


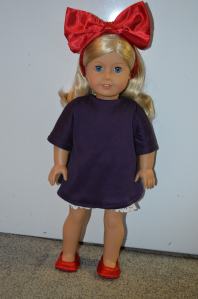
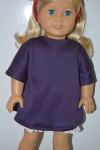
Once you’ve finished, you’ll have something like this:


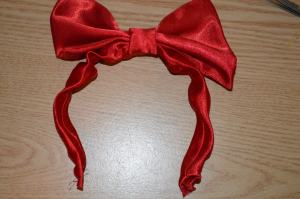
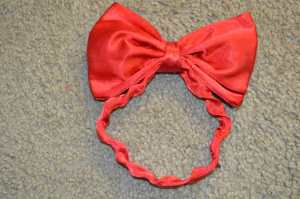
In our next post, we’ll be making Kiki’s large hair bow.
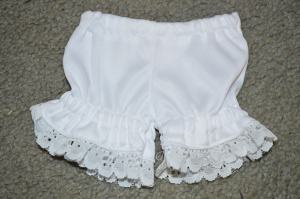