Kiki’s Delivery Service -Accessories

Today’s post is a simple blueprint to finish your Kiki outfit. It’s mostly following patterns with minor changes.

dsc_0406

Bloomers

dsc_0413Kiki has a lacy pair of bloomers that peek out from under her dress as she flies her broom.

Materials:

  • Simplicity pattern 1392 View D
  • lightweight white knit fabric (3/8 yd)
  • 3/4 yd of 1/4″ elastic
  • 3/4 yd of 1/2″ wide lace

Follow the directions on the pattern. If anything, make the legs shorter.


Red Flats / Shoes

dsc_0414Materials:

  • McCalls pattern 3469 View G
  • red satin (same material as hair bow) or red leather
  • Foam remnant 6″ X 5″ (optional)

I used the same fabric for the shoes and the lining. I left off the foam, ribbon, and soutache.


Messenger Bag

Materials:dsc_0412

  • McCalls pattern 3469 View C
  • yellow or orange-yellow canvas
  • lining (I used the purple material from the dress as the lining.)
  • Snap

I left off the embroidered trim.


Now all you need is a black cat and a broom!

dsc_0406


Kiki’s Delivery Service – Hair Bow

Kiki’s huge hair bow is essential for her costume. It can be made with three rectangles of fabric.

Materials:

  • red satin
  • interfacing
  • 1/2″ elastic
  • ruler

Rectangle #1: Bow

  • Measure a rectangle approximately 12″ X 4″of both the satin and  interfacing. Interfacing should be placed on the wrong side of the satin.
  • Hamburger fold them right sides together with the interfacing on the outside. Sew the side edge, but leave a 1″ opening in the middle. (The scissors are pointing to the opening.)dsc_0422
  • Rearrange the fabric so the opening is in the center and stitch across the top and bottom edge. Clip corners and turn right side out. Hand stitch closed.

Rectangle #2: Knot

  • Cut a rectangle  3″ X 4″. Hot dog fold with right sides together, stitch tube, turn right side out.
  • With right sides together, stitch the tube into a circle.(If you’re an overachiever, you can slip stitch it closed, so that there are no raw edges. This part gets hidden, so I don’t bother with the extra work.)dsc_0428

Rectangle #3: Headband

  • Cut a third rectangle 13.5″ X 2″ on the bias so it has some extra stretch. With right sides together, stitch into a long tube that is just wider than the 1/2″ elastic. Trim excess edge. Turn right side out.
  • Cut a length of 1/2″ elastic 12″ long. Thread it through the tube.  Sew a straight line over the end of the elastic and tube. Repeat at the other end. The red material will scrunch because it is longer than the elastic.dsc_0430
  • Slide the headband tube through the knot. (The bow has also been slid through the knot in this picture, but it doesn’t have to be.)dsc_0433
  • Sew ends of tube and elastic together in a circle with right sides together. (This is another place slip stitching can make your work prettier, but I just hide this edge under the knot.)


  • Pull the headband around so that the raw end is under the knot.
  • Slide the bow through the small circle and arrange aesthetically. You may need to fold or bend the knot so that it doesn’t look perfectly flat.dsc_0445
  • You can tack everything together if you don’t want little fingers to be able to pull the bow out.

Strong work! The primary two elements of Kiki’s costume are complete. On the next post, we’ll add the finishing touches that make the outfit stand out: bloomers, shoes, and messenger bag.

Kiki’s Delivery Service – Dress

Kiki’s Delivery Service is a great coming-of-age animated film produced by the talents at Studio Ghibli. I just learned the movie is based on Eiko Kadono’s book – I need to find an English translation! If you haven’t seen the movie, I highly recommend checking your library to see if they have a copy.

Today we’ll be modifying a dress pattern to replicate Kiki’s witch dress. We’ll later add the bow, bloomers, shoes, and messenger bag.

dsc_0406

Materials:

  • dark purple (almost black) knit fabric – anything with a bit of drape and flow will work
  • McCall’s 7266 pattern
  • matching thread
  • 1/2″ velcro

dsc_0411

Since Kiki wears a loose, flowy dress, I merged a shirt and coat pattern. I used pieces 1, 2, 3, 17, 18 from M7266. You’ll be overlapping them on folded fabric.


The back consists of piece #2 with #17 reversed and laid on top. We’ll be using the facing of #2, so that we’ll have a velcro enclosure on the back. Here is the view before and after cutting:


The front consists of piece #1 reversed on the fold and #18 laid on top. #18 hangs over the fold, so there will be a large portion of it that won’t be cut out. Here is the view before and after cutting:

If you’re wondering about the masking tape in the pictures above, they are marking the wrong side of the fabric. It is sometimes tricky to tell which is the right and wrong side of the fabric. When I have two similar sides, I use tape to tell them apart.

Sew the pieces according to the directions for the shirt (View A) included with the pattern.  Use a scant seam allowance on the sleeves to keep them wide. Using the 1/4″ seam allowance will make them look more snug than they should be. Be sure to shorten the sleeves to 3/4 length, which is still longer than View A’s directions.

dsc_0401

One of the more confusing parts of the pattern is step 5 directing you to “Stitch FRONT FACING 3 and back self facings together at shoulders.” Pattern piece 3 (front facing) is connecting the two facing pieces from pattern 2 (back) like a bridge. This is what it should look like if you stitch them together correctly:


Step 6 directs you to understitch the facing. If you’re relatively new to sewing or just need a refresher, there is a great tutorial at Sewaholic. It has images and walks you through the process of understitching. Very  helpful.

The skirt length will need to be shortened.

dsc_0410


Once you’ve finished, you’ll have something like this:


In our next post, we’ll be making Kiki’s large hair bow.

Paper Bag Princess – Sewn Bag Dress

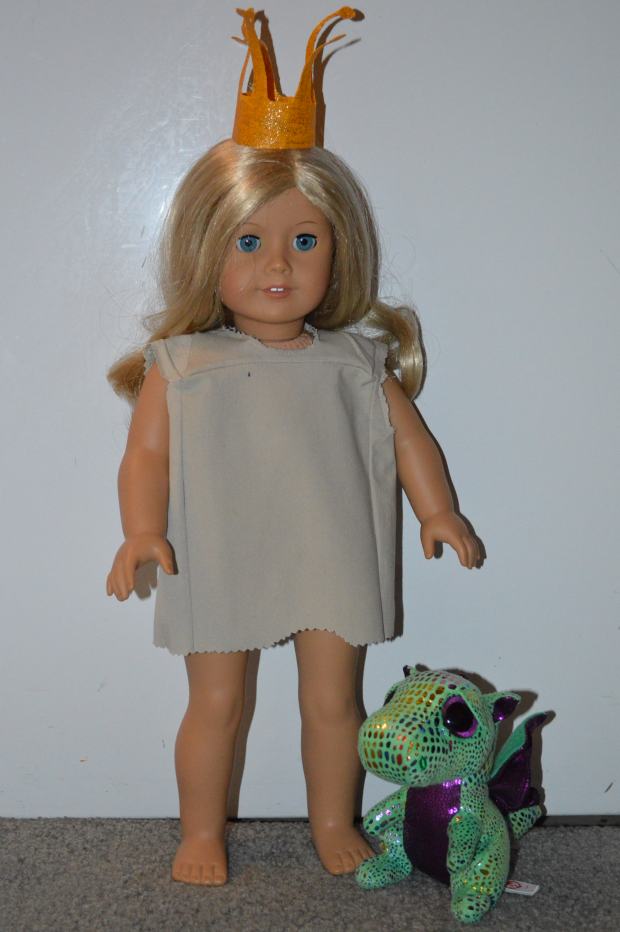
For our final day of Paper Bag Princess tutorials, we’re going to sew a ‘paper bag’ dress. The paper bag dress we made two days ago is great, but isn’t long lasting. I wanted to sew a fabric dress that could stand up to play, but still looked like Princess Elizabeth’s paper bag dress.

dsc_0382

Materials:

  • tan fabric (I used an old pair of khaki pants that was ruined in the wash by a pen. You can use stiffer material if you really want to replicate a paper bag.)
  • matching thread
  • 3/4″ Velcro
  • pinking shears
  •  paper lunch bag

I recommend deconstructing a paper bag at the seams to get an idea of the folds. I have the one I used here and the dimensions. The numbers marked in marker are the dimensions before adding seam allowances.

DSC_0383.JPG

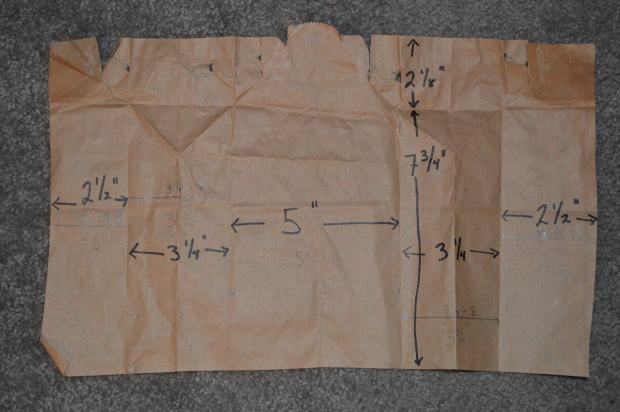
After adding the seam allowances, you’ll cut panels with the following dimensions:

  • two 3 1/4″ X 10″ (these are the two panels that make up the back)
  • one 5 1/2″ X 10″ (front)
  • two 3 3/4″ X  10″ (sides)

For the following sewing directions, I used 1/4″ seam allowances.

  1. Sew the long side of 3 1/4″ (back) panel to the long side of the 3 3/4″ (side) panel – right sides together. Repeat for the other two corresponding panels.
  2. Sew the other long side of the 3 3/4″ (side) panel  to the 5 1/2″ (front) panel – right sides together. Repeat for the other side of the 5 1/2″ (front) panel.
  3. At this point, all of your panels should be connected. Fold and hem the raw, long sides of the 3 1/4″ (back) panels.dsc_0340

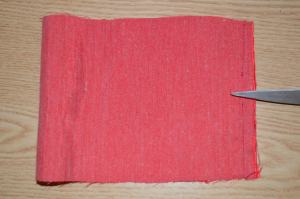
Trim across the raw edges on the top and bottom with pinking shears – this helps give it a paper bag look and will keep it from fraying.

Fold 2 1/2″ of fabric down from the top with right sides together. Iron.


dsc_0341


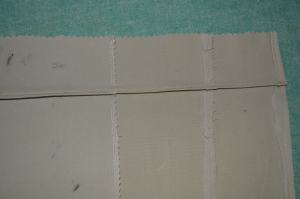
With right sides together, stitch a scant seam across this fold. Fold over so that the wrong isides are together and iron the fold.


Iron all the vertical panels to help make a box shape.

Now we’re going to start folding, ironing, and pinning the base of our paper bag (which is the bottom if you’re packing a lunch, but will be the top of our dress – confusing semantics).

This part can be tricky and using your deconstructed paper bag to visualize the folds can be helpful. Take your time folding the base to make it look like a lunch sack.

dsc_0350

Stitch down the diagonal folds coming from the corners. Go slowly and check that your bag is keeping the proper shape as you go. I turned it inside out and stitched with the right side up to keep an eye on the construction.

After that tricky folding, cutting the neck and arm holes is stressful. Cut a small opening and gradually make them larger. You don’t want to make it irreversibly too large -. heartbreaking after all that work. Try it on your doll as you go and adjust the openings accordingly.

dsc_0351

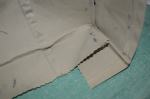
I started the arm hole opening with a small cut 1 3/4″ below the shoulder seam with pinking shears.

dsc_0359I folded the fabric in half and cut it symmetrically.

Stay stitch around the opening.


dsc_0355


Cut the neck opening at the front of the bag. Stay stitch.


dsc_0353


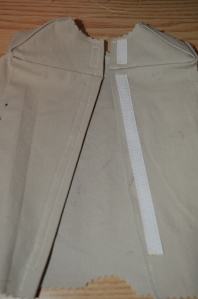
Cut an appropriate length of velcro for the back. I cut the strip in half so that it is not so wide. The back panels overlap, so make sure the panels align to make a symmetrical box before you sew in place. I also put a small strip of velcro on the top.

I didn’t put velcro all the way to the bottom because I wanted to be able to trim the length.


dsc_0267


Use pinking shears to trim the bottom of the dress to the length you want. Trace the bottom of a bag onto the front of your dress and cut out that half circle.


Don’t forget to iron the creases in the side of the dress to look like lunch sack folds.

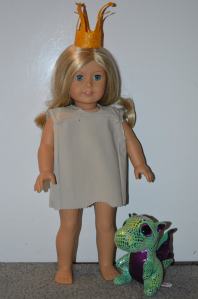
Top with a crown and you’ve done it!

Whew! That ended up being more difficult than I expected, but the dress ended up looking pretty good. Come on, it’s a bag, so it’s only going to look so good. Please tell me my kids will play with it enough to be worth it.

dsc_0382

Our next post will be Kiki’s Delivery Service!

Paper Bag Princess – Crown

Welcome back to day two of Paper Bag Princess tutorials to transform your 18 inch doll into Princess Elizabeth. We’re going to make Elizabeth’s crown today – post dragon attack. It’s fairly quick and easy to make. Best of all, my doll’s perpetually messy hair fits perfectly for Princess Elizabeth’s look.

dsc_0369

Materials:

  • Thick fabric – I used yellow canvas (gold would be ideal), cardboard would be fine too
  • Gold fabric paint
  • paint brush
  • glue gun

dsc_0357

I started by measuring  6.5″ across the canvas. Then I drew out a general shape of the melted crown.

Paint the fabric and let it dry. The canvas was already starting to curl, which is perfect for the melted look that we’re going for.

Flip it over and paint the other side.

dsc_0362
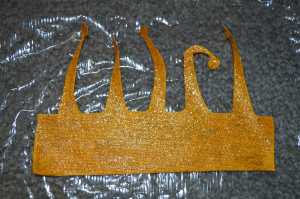
Glue or sew the two ends. I used a glue gun.

You can attach a clear elastic band if you want to keep it on during play.

dsc_0375The painted canvas is stiff enough to hold the prongs up, but flexible enough to be bent down to get the ‘melted’ look of Princess Elizabeth’s crown.

Next post, we’ll make a sewn/cloth version of the paper bag dress.

Paper Bag Princess – Easy Dress

Hi! Have you heard of the Paper Bag Princess by Robert Munsch? I somehow missed it when I was a kid and didn’t discover it until I had a daughter. It’s a great, empowering, heroic girl vs. dragon story.dsc_0375

If you haven’t read this illustrated book yet, a dragon attacks Princess Elizabeth’s kingdom, destroying pretty much everything, including the fancy gown she was wearing. With nothing to wear, the princess dons a paper bag and sets off to save the prince.

After our lengthy Quidditch uniform tutorials, we’re going simple today. I’m going to start this series of tutorials with a literal paper bag dress. No sewing today. We’re strictly in craft territory today. From here, we’ll move on to a crown tutorial and finally a sewn, fabric ‘paper bag’ dress  (much more durable and longer lasting.)

The paper bag dress is incredibly easy. A regular lunch size bag will fit your 18 inch doll. This dress can be done in a few minutes with scissors and tape! (Sometimes a fast costume to go along with a read-aloud is all you want!)

dsc_0230


First, cut the bottom 3 inches off a paper bag.


dsc_0231


Use the piece you cut off and trace the bottom curve onto your remaining bag. Cut that piece out.


Next, cut a line up the center of the back and cut a neck hole in the top.


You can cut the arm holes in two different ways:

  • You can cut them with the corners of the bag left on for a boxy look
  • /or/  You can cut the corners off when you cut the arm holes

Check the length to see if you like it. I ended up cutting another 1/2″ off my dress.

Fasten it at the back with tape.


Your doll is ready to save her kingdom!dsc_0375

We’ll have another quick post tomorrow on how to make the ‘melted’ crown.


Quidditch – Arm Pads

We’re down to the last piece of equipment for our Quidditch uniform. If you kept your Quidditch robe sleeves full length, you can get away with skipping this step and the uniform still looks complete. If you decided to make the robe sleeves 3/4 length or you’re a  purist, then work on:

dsc_0335

Materials needed:

  • brown synthetic leather (I used the same fabric and I used for the shoes, shin guards, and knee pads)
  • tan or cream fabric for the piping and back of the pads
  • piping or string/yarn to make your own piping
  • matching thread
  • 3/4″ Velcro or elastic

You’ll be using the same technique that you used for the shin guards. I won’t be as detailed today since its a similar procedure.

First you’ll cut out leather for the upper part of the arm pad. The general shape and dimensions are shown below. I would cut both arm pieces out on folded fabric so that you  get symmetric pieces with the curves on opposite sides

dsc_0325


Next, you need to sew from the back to make the panels – just like we did for the shin guards.


dsc_0326


Once the panels are sewn, you can cut the lower part of the arm pad out of the leather (the part that covers the wrist and top of the hand.) The general shape is a rectangle with rounded corners on one side. It should be 1 1/2″ tall and as wide as the piece you’ve already sewn.


dsc_0328

This time you’ll be sewing the panels perpendicular to the other piece. When you’ve finished, the two pieces together will look like this:


Sew the two panels together wrong sides together.

Now, it’s time for the piping. Make and add it just like we did for the shin guards. There are more curves, so you’ll have a lot of edges to clip. Go slowly.

dsc_0333


Next, you’ll add 4 leather strips per pad to make the straps. I cut them 3/4″ X 2 1/2″. You’ll arrange them as shown in the picture. Sew them in place.


Next, cut white/cream fabric backing traced from the shape of the pad. Leave a wide margin – you can cut off the extra later. Sandwich all the pieces together with right sides together. Make sure any long straps are folded under, so they don’t get sewn to both sides by accident. Leave a space to turn the arm pad right side out. Trim extra fabric near the stitching. Turn and sew the opening closed.

dsc_0337


Cut a 1″ strip of velcro in half and attach to the straps. Put the sharp, hook side so that it faces up / away from the doll (otherwise it will stick to the sweater.). The soft, loop side works better facing down / towards the doll. Everything should look like this when you’re done.


dsc_0339


We did it! A full Quidditch uniform for your doll!

Our next book will focus on costumes for The Paper Bag Princess by Robert Munsch.

Quidditch – Sweater

Harry Potter is the reason I learned to knit. My first project was a Hogwart’s scarf and then I got ambitious and decided to tackle a Quidditch sweater. Learning on a doll-sized sweater is the way to go. It still a slow process, but much less so than making a human sized sweater. You’re developing the same skills on a smaller scale. You’re not out nearly as much time or money if it goes wrong.  Plus, putting a wonky sweater on a doll doesn’t carry the social awkwardness it does for a person.

dsc_0318

Since I’m relatively new to knitting, I won’t be brazen enough to claim to teach you how to knit a sweater. This will not be a full tutorial – more of a demi- or semi- tutorial. I’ll just set you up with the basic blueprint and let you go from there. Jump right in and see if it works out. You can look up tutorials online for slip stitches, binding off, etc. as you go.

Materials:

  • Redheart’s “Love My Doll Sweater” directions and you tube video
  • Burgundy/cardinal yarn – 1 skein (I used Lion Brand Wool-Ease Yarn in Cranberry)∗
  • Yellow yarn – 1 skein (I used Big Twist Baby Yarn in Dandelion)∗
  • Size 4 (3.5mm / US 4) Knitting Needles
  • Stitch markers (I used small pony tail holders)
  • Yarn Needle

∗ I prefer to use the same yarn collection for projects to make sure the stitch sizes will be the same. Unfortunately, I couldn’t find the exact color combination I wanted without mixing brands. I was careful to pick ones that were similar and it worked out. Both are Medium 4 and listed the same number of stitches per test swatch.

dsc_0223
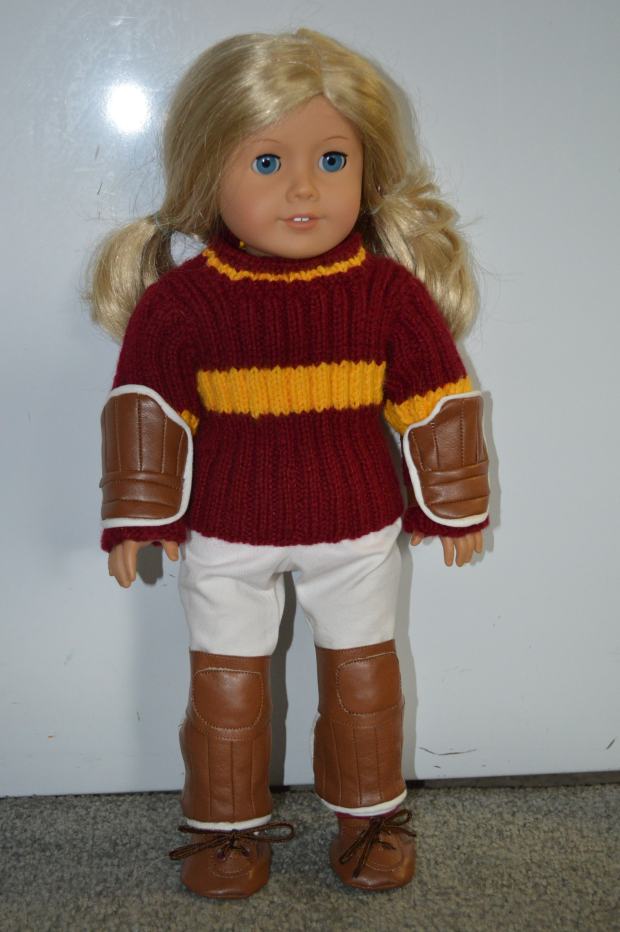
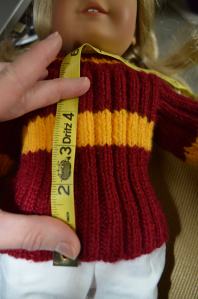
Starting with the cranberry yarn, I cast on 48 stitches instead of the 37 the pattern states. Rib knit accordions in on itself, so you’ll need more stitches than if you were doing all knit stitches. (I averaged about 8 stitches/inch). Also with the fitted stretch of the rib knit, you don’t need a full 7 1/2″ width per side that the pattern states. The sweater stretches a lot and should fit snugly. I made each side 6″ wide when laying flat and unstretched.

After casting on, I started immediately with a rib stitch pattern (a repeating pattern of 2 knits and 2 pearl stitches) working my way up from the bottom of the sweater. (I did not start with a broken rib pattern for a band at the beginning like the pattern does.) I also made my sweater a 1/2″ longer than the directions. I wrote in the dimensions I changed on Redheart’s pattern:

dsc_0322


As you can see in this picture, you’ll be knitting a front piece, back piece, and two sleeves separately. Once the individual pieces are made, you stitch them together with a yarn needle.

dsc_0219

I continued the rib knit until the sweater was 3 inches high from the bottom. For my stitch size, that made approximately 24 rows before I switched to the dandelion yarn.

After switching colors, I used a straight knit for one row and then continued the rib stitch (the row of knit stitching keeps the color change from looking strange). The dandelion color should make up the next inch of sweater (approx. 8 rows).

Switch back to cranberry and begin shaping the armhole according to the pattern’s directions.


Continue with Redheart’s directions for shaping the armhole, making the sleeves, and finishing.

dsc_0221

For the sleeves, I continued the rib stitch, but cast on with 28 stitches (the pattern calls for 21 stitches cast on.) Once again, I went straight into the rib pattern and did not start with a Broken Rib pattern. I continued the cranberry yarn for approx. 2 inches and then switched to dandelion yarn for one inch. From there you finish with cranberry.

I did make my sleeves a little too long, so I should have stopped knitting earlier at the end (knitted less at the end/top of the sleeve). This would have shifted the sleeve up and made the dandelion arm band a little higher and more even with the chest band.

dsc_0222


Knit the Neck Ribbing according to the pattern alternating single knit and pearl stitches.I knit two rows of cranberry, two rows of dandelion, and two rows of cranberry.  Be careful with the casting off – it it’s too tight, you’re doll’s head won’t fit through.


I hope this gives you a little guidance if you’re interested in knitting your own sweater. My final product isn’t the most polished, but it’s a respectable first attempt at a sweater and looks great peeking out from under the robe!

Our last piece of equipment will be arm pads.

Quidditch – Knee Pads

Day 4 of our Quidditch uniform! We’ll be adding the knee pads. These aren’t nearly as much work as the shin guards.

dsc_0262

Materials needed:

  • McCall’s 6904 view I
  • brown synthetic leather
  • tan or cream fabric for the piping and back of the pads (optional)
  • piping or string/yarn to make your own piping (optional)
  • matching thread
  • 3/4″ Velcro

Just like yesterday’s shin guards, you have an easier option:

dsc_0253
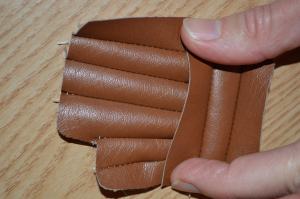
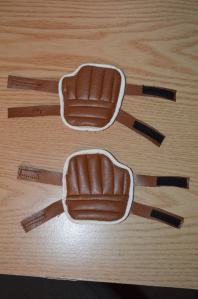
I’m not going to lie, I think the easier option is the way to go. If you follow the general directions with the pattern (piece #21), you can make knee pads that look like this picture.

For this style, you’ll need to cut out an additional piece of leather traced from the rounded rectangle on the pattern (marked in the center as stitching lines.) I stuffed a little batting under the rounded rectangle to get it a little elevated compared to the rest of the leather. I also used the minimal seam allowance possible when sewing the rounded rectangle..

The second option has a few more steps and takes more time. If you are great with piping or you want a new challenge, then carry on with the additional steps. Mine didn’t turn out well, but I will leave the directions here in case you can make it work.

Once you get the general pattern cut out, I traced and cut a rounded rectangle/oval based off the stitching lines on the pattern.

Next you’re going to sew the piping on the oval just like we did with yesterday’s shin guards.

dsc_0217


Once the backing is sewn onto the center oval, turn it right-side out and stitch-in-the-ditch to the long part of the knee pad.

dsc_0218


Attach the velcro according to the pattern’s directions and you’re all set.

dsc_0202


Meh.


Sadly, after all that extra work, I like the plain ones better. Here are the ones I’m going to use:dsc_0255

Coming next, the Quidditch sweater!